Tips/Tutorials

Welcome to the machine by Canberra Photographer - Geoff Jones

Mary Li and I teamed up with my model friend, Fidesse Fehr, who flew down from the Gold Coast. We shot together a while back in 2012 and I was very impressed with her enthusiasm, as well as her natural ability to pose and work with the camera. This time was no different - To say I was happy with the results would be an understatement...

Mary Li - Fidesse Fehr - Geoff Jones

The title for the image comes from one of my all time favorite songs "Welcome to the machine" by Pink Floyd. While the "machine" in the song is meant to represent the music industry; to me, the "machine" is our culture and society - a machine that is, for better or worse, force fed to us via the media and by extension, the television set.

I searched high and low for just the right type of old TV and finally found one at the local dump (along with a couple of milk crates).

The light from the TV itself was never going to be bright enough, so I had to create my own by ripping out the innards and placing an AB800 strobe inside. I then lined the inside with white cardboard, and placed a white diffusion sheet and cooling filter on the front. The cooling filter was used becasue light from a TV is generally on the cooler side.

I used 4 lights in total; a warm soft box off to the right, a cool light off to the left to highlight the back of the TV, a very dim white fill light bouncing off the roof, and of course, the light from the TV. 

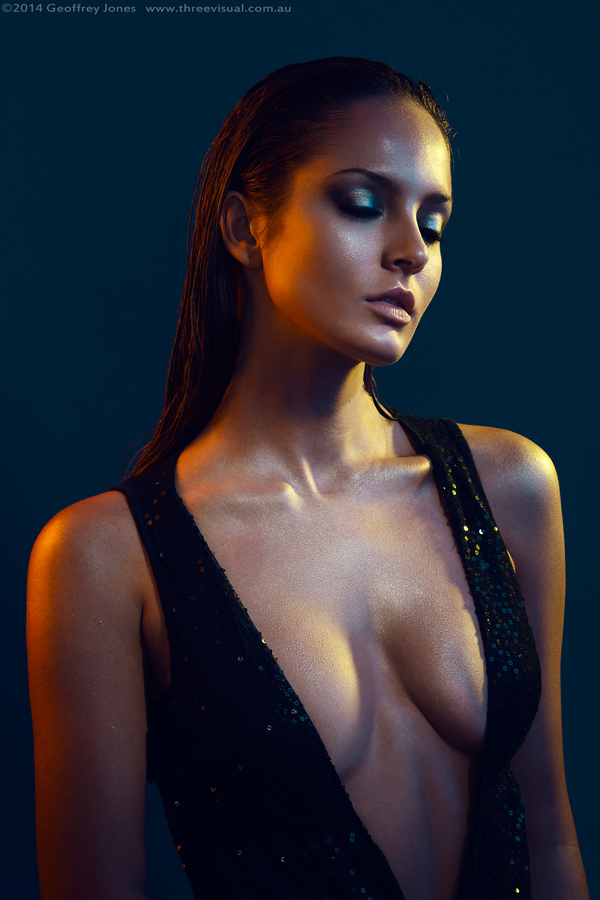
We switched things up a little for the second look. I am a big fan of dewy skin and dark eyes, which Mary managed to achieve flawlessly.

The image was shot with a teal gel off to the right and a warm gel to the left.

Model: Fidesse Fehr 
Makeup: Mary Li

Feel free to leave any questions in the comment section.

Models: What does the photographer expect of you during a photo shoot? by Canberra Photographer - Geoff Jones

Model: Grace Monck, MUA: Mary Li, Styling: Hannah St James

Model: Grace Monck, MUA: Mary Li, Styling: Hannah St James

Introduction

You may be a new model looking to get into the industry and not really knowing what to expect from photographers and what they expect from you. I hope to give you an insight into what is expected of you, and to help you think more about your role during a shoot. The opinions expressed here are my own views, derived from my own experiences as a fashion and beauty photographer. Take from it whatever you find useful, and feel free to agree or disagree in the comments section below.

This article is not a "Modeling 101". I won't be going into specifics about how to pose, where to place your arms and hands, etc. It is also geared more towards new models, and what is expected of them, rather than the photographer (we will save that for another time). However, I will be writing an article soon which does go into more specifics about modeling and posing. So keep an eye out!

Expect and Prepare

Photographers can be an interesting bunch. Like any group of people, there are many different types with varied personalities and differing expectations. As a photographer, I tend to take a lot of control during a photo shoot regardless, but what I expect of a model varies greatly on the situation. If I have been commissioned for a portrait session or a portfolio, then the onus is on me and only me. I will direct the models every move and pose... but, if you as a model have been hired for the shoot, then you need to bring it. This applies to tests and collaborations as well.

As a model, you will soon discover that every photographer has their own style of shooting. Some photographers will barely say hello to you, let alone give you any direction. What are you going to do in this situation? Standing there confused, waiting to be told what to do, isn't going to cut it. Believe me, the final product in this situation is going to be... less than spectacular. You need to be confident. You need to know what your flaws are and how to hide them. You need to know what your best look is. You need to be prepared.

I know it's been said a thousand times before, but spend a lot of time in front of a full length mirror. Experiment with how and where your neck pivots. Look at how your limbs form lines and shapes. Read a lot of high-end fashion magazines and study the poses. The goal here is to understand what makes a good pose, and to develop a set of "go to poses" that you can bring to any shoot.

During a photo-shoot, there are many things a model needs to take into consideration. One of these is the lighting. Although it is by no means your responsibility to be in control of the lighting, it certainly would pay for you to have a basic understanding of how light works; particularly in how it falls on your face in relation to its position. However, don't concern yourself too much with this, as lighting is the responsibility of the photographer, and a good photographer will give direction in regards to the best posing positions for the situation. A photo-shoot is a team effort, so educating yourself on other aspects of the shoot can certainly be useful.

Move

What photographers absolutely do not want is a model who stands there with a blank expression, waiting to be told what to do. Dance around, pull a silly face, jump up and down, bark like a dog... Something  -anything- is better than nothing (ok maybe don't bark like a dog, but you get the idea). Sometimes the best shots can come from an off-the-cuff "between takes" interaction. A good photographer will be able to capture the right moment. Do your part to the best of your ability, but leave "getting the shot" up to the photographer.

Ultimately in most situations, what we want is a model who can move gracefully and fluidly from pose to pose. This allows us freedom to shoot as we go, without having to worry about posing the model. The end results are often far more dynamic and interesting, than shooting static poses. An excellent example of fluidity in posing can be seen below. (thanks to very talented Shantia Veney).

If you practice enough, you too can get to that level of posing. Again, don't worry if you are not nailing every move. Let the photographer worry about when to click the shutter button. You will only improve with time.

Confidence plays a huge roll. A lack of confidence will show in the final image. While you may be working with a photographer with great interpersonal skills who makes you feel at ease; For whatever reason, you may just not be feeling very confident. If you find yourself in this situation, it may sound simple but often the best strategy is to actconfident (even though you may not necessarily be feeling it). By doing this, you will find that you actually start to feel real confidence. Other factors which can positively influence your confidence include: Getting a good nights sleep, eating well, exercising, and basically making sure you are as prepared as possible. If there is no music playing at your shoot; demand it ;)

Communicate

Firstly, be honest about your experience level. If you feel like you need more direction, let the photographer know. Speak up if you have any concerns at all; especially when it comes to doing anything you are not completely comfortable with. There is no shame in saying no to a particular pose or concept. If you feel the need to bring an escort to the shoot, be sure to ask the photographer well beforehand. Many photographers are ok with escorts, but just as many are not. Every extra person present at a photo-shoot is a distraction (whether they are being helpful or not) so keeping the numbers to an absolute minimum is usually the best bet.

Lastly, have fun, relax and leave your inhibitions at the door. Don't be afraid to look silly, and don't be afraid to try a pose that might not work! As a photographer, I don't care if 9 out of 10 shots don't work. Those will just be deleted. What I care about is that 1 in 10 that do work.

Parting Words

Whether you are a professional or hobbyist, Modeling, is not an easy thing to do. Most people only see the polished end result in that art print or glossy magazine. They have no concept of the time, effort and dedication the model puts into each and every shoot. I have the utmost respect for a model who is dedicated to his or her craft, no matter their level; as it can require a lot of courage, while being emotionally and physically draining. It can also be incredibly rewarding.

So in closing, I say thank you for the time and effort you put in. Thank you for the late nights, and early starts. Thank you for bravely facing the elements. Thank you for letting us cover you in glitter, and thank you for the hours you spend in the makeup chair. You are an integral part of the creative process, and without you, there is no final image.

~Geoff Jones, Photographer

Photoshoot with Makeup Youtube sensation, Chloe Morello. by Canberra Photographer - Geoff Jones

My friend, Chloe Morello recently contacted me to tell me she was coming to Canberra for a shoot with the Canberra Weekly. So of course we had to arrange a creative collaboration while she was here! Makeup was by very talented, Mary Li.

You may know Chloe from her extremely popular Youtube channel where she shares makeup/beauty tips and tutorials. She is also a VEET Beauty Producer, and beauty ambassador for CLEO magazine... as well as being an all around awesome person!

Chloe Morello. Makeup by Mary Li.

Chloe Morello. Makeup by Mary Li.

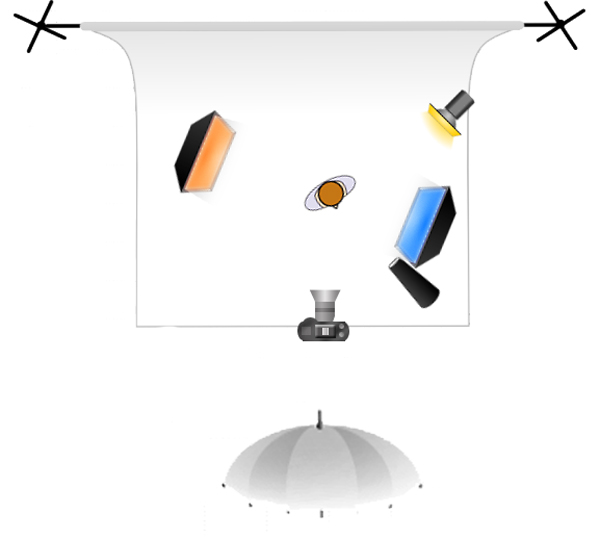
The above image was created using the following 5 strobe light setup:

  • Small softbox to the left of frame with an orange gel, 35º to the rear, pointed at model.
  • Small softbox to the right of frame with a blue gel, 35º to the front, pointed at the model.
  • Strobe with a 7" reflector, grid and yellow gel, to the right of frame 45º behind the model.
  • Gridded snoot 45º in front of the model, right of frame to balance out the gels.
  • Large shoot through parabolic reflector directly behind the camera for overall fill at a low intensity.
  • Royal Blue Superior paper backdrop.

The blue gel was used as a subtle effect to balance out the warmth of the other lights. It is mostly visible in the highlights between the orange and yellow gels. You will notice it on Chloe's left shoulder, forehead and eyelids.

The idea with the large shoot through parabolic umbrella, is to balance out the intensity of the coloured gels, as well as reducing the overall contrast of the lighting. This light was set to a very low level.

Of course, the look would not have been possible without Marys makeup talents. She used a shimmer product on Chloe's skin to enhance shine.

The lighting for the second shot was switched up to provide a more subtle effect. I used a blue gelled softbox 45º behind Chloe to highlight the wet half of her face. A 21" silver beauty dish was used as the main light.

Chloe Morello. Makeup by Mary Li.

Chloe Morello. Makeup by Mary Li.

All in all, a very fun shoot and I was extremely happy with the results. Be sure to check out Chloe's Youtube channel if you have not already done so. [Link]

Please feel free to leave any questions in the comment section below.

Getting more control with contrast using gradient maps by Canberra Photographer - Geoff Jones

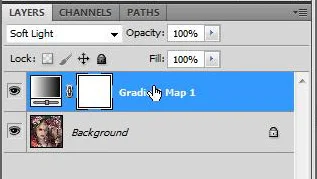
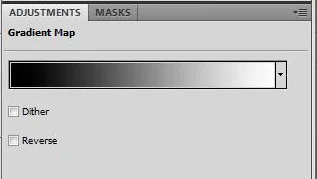
No doubt when editing a photo for a client; be it for fashion, beauty or commercial - you will want to adjust contrast. Let's face it, the basic contrast slider in Photoshop doesn't give you much control, so here's a different method for adjusting contrast using a gradient map. First hit "D" on your keyboard to change to the default foreground and background colours black and white. Then make a new gradient map adjustment layer. You should now have a slightly contrasted black and white image. If your image is in negative, tick the "reverse" box. Now set the layer to soft light.

2e

Click on the gradient bar to open the Gradient Editor window.

3e
5e

Now, there are a number of different places where we can make adjustments to the contrast. The black and white box's on either side are called "colour stops". These act as controls for the gradient. If you click on the black colour stop, then click the colour itself underneath the opacity control, you can then change it to a lighter shade of grey. This will bring back some of the shadows. Likewise you can change the colour of the white colour stop to bring back some of the highlights.

Experiment a lot. You can also use this method for split toning outside of camera raw.Another point of adjustment is the "colour midpoint". If you click on one of the colour stops, a little diamond shape appears in between the colour stops. This can be dragged left or right to change the position of the gradient mid point. You can also manipulate the colour midpoint, and the colour stop by clicking on the location box at the bottom of the window and using the up and down arrow keys. I find this method far less painful, as it prevents accidentally creating a new colour stop. If you do accidentally create an unwanted colour stop, just click on it and hit delete.

Have fun and I hope you found this useful!

Geoff Jones Canberra ACT Australia fashion, portrait, beauty and commercial photographer.

Don't overdo it! by Canberra Photographer - Geoff Jones

Original

Original

Edited

Edited

When editing the eyes for beauty images, don't be tempted to give your model vampire eyes. In this cropped close up, I kept the colour of the iris and the eye whites natural by simply increasing contrast and brightness. There is nothing worse than seeing a portrait of a beautiful subject ruined by spooky over-saturated eyes.

In some circumstances, you may want to doge and burn the iris to add pop and contrast, but again don't overdo it.

As far as the eye whites go; Again, keep it simple. Don't remove all of the veins, and remember that the eye is spherical - there should be some shadow to show this. Don't over whiten the eye whites. If you have enough light on your subject, you shouldn't have to whiten the eyes at all. In some cases it's desirable to keep them dark.

Adding a subtle soft dark edge to the iris can give a nice effect.

Lighting: Fill light by Canberra Photographer - Geoff Jones

As you know, in photography,  fill lighting is simply used to fill in shadows. A good starting point for the fill light should be at around half the brightness of the main light, and adjusted to suit the effect you are going for. You generally want the fill light to be perpendicular to the main light, but obviously this is not always desirable. You also want the fill light to be as soft as possible, as its function is not to create shadows, but hide them.

There are many ways to use and place the fill. I like to use cheap white cardboard reflectors which you can buy from art shops for a few dollars, as these give a nice soft fill, and are easily bendable foam core is another option, but I prefer cardboard. This works particularly well for beauty lighting where the white cardboard is placed under the models face and bent upwards from either the front or the sides. This also gives a nice lower catch light as it is reflected in the eyes. You can adjust the intensity of the fill light by simply moving the cardboard further or closer to the subject. You want the fill light to be as soft as possible, which is why it's best to use white over silver reflectors (although silver is sometimes more suitable).

Another method I sometimes use for fill is to bounce a strobe off a wall or the ceiling. essentially turning the surface into a giant soft box. This will give you a very soft light. In this photo, I used the above method for the main light as I wanted the light to be very soft and even. I placed the strobe behind the camera and to the left and pointed it up to the ceiling. You will notice the light is still darker on one side of her face, but the effect is very subtle. I also placed two large rectangular soft boxes behind the model off to either side for some accent lights.

essence_of_beauty_by_eman333-d38u8o4[1]